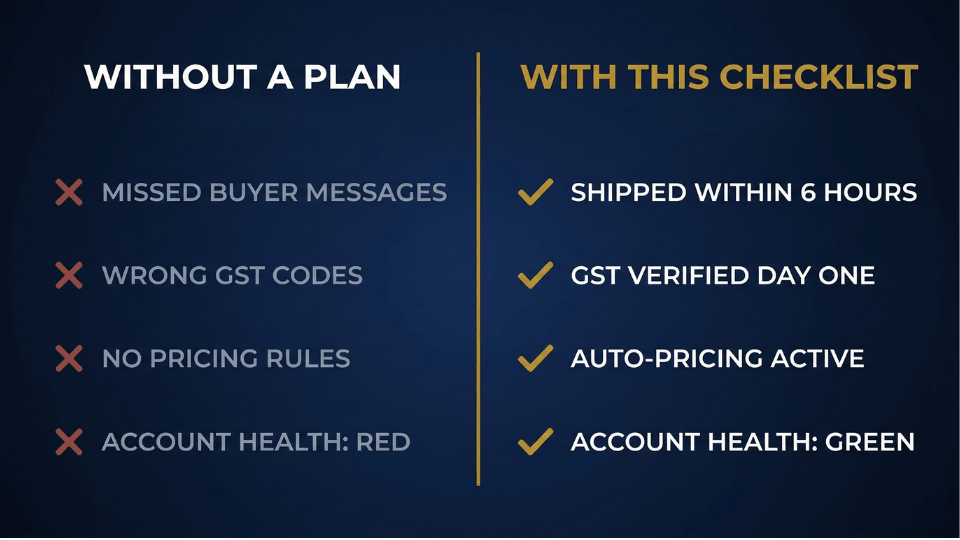
Last November, Deepa Nair from Kochi watched her phone light up with the notification she had been waiting weeks for. Her first order on Amazon.in had come through. The excitement lasted about four hours. Then reality hit. She had no idea what to do next. Deepa did nothing for two days, shipped late on day three, and earned a 2-star review by day ten. Her account health turned yellow before she made her second sale.
Most sellers celebrate and then freeze. What happens after your first sale on Amazon is more important than the sale itself, because the habits you build in week one shape your account for months. This post gives you a day-by-day Amazon seller first week checklist so you never repeat Deepa’s mistake.
Why Your First Week After the First Sale Matters Most
Amazon Starts Scoring You Immediately
The moment your first order comes in, Amazon begins tracking your performance. There is no grace period for new sellers. Your Order Defect Rate, Late Shipment Rate, and Pre-Fulfilment Cancel Rate start accumulating data from day one, and these numbers feed directly into your Account Health Rating. Arjun Patel from Ahmedabad learned this the hard way. He assumed Amazon would cut new sellers some slack and ignored a buyer message for three days. Within a week, he received a policy warning that stayed on his account for 90 days.
The Compound Effect of Early Habits
Think of your first week as the foundation of a building. Fast shipping, prompt replies, and clean order fulfilment compound into real advantages. Amazon’s algorithm rewards consistency, and sellers who demonstrate reliability from the start earn better Buy Box eligibility and stronger organic ranking. Your first sale is not the finish line. It is the starting block.

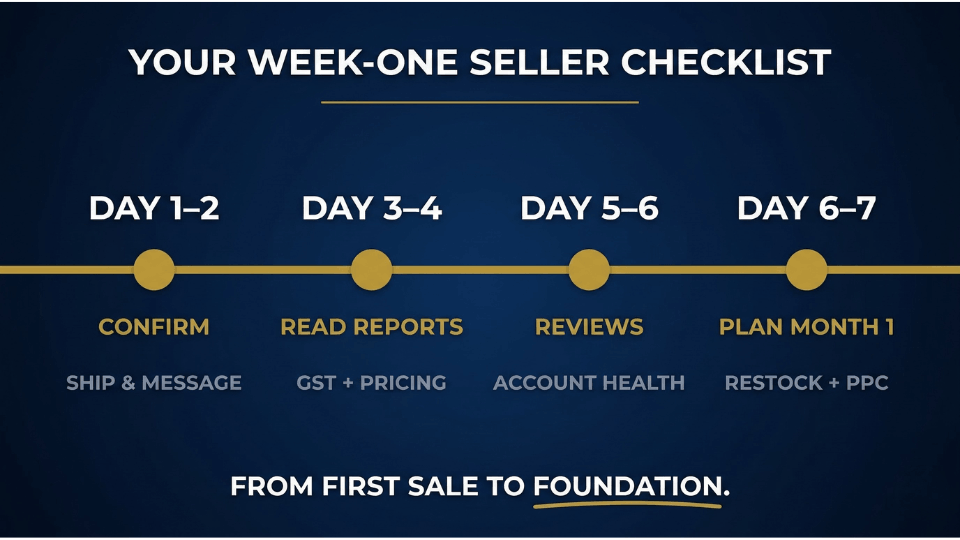
Day 1-2 – Confirm, Ship, and Communicate
Verify the Order and Check Inventory
As soon as the order notification arrives, log into Seller Central and verify every detail. Confirm the product, quantity, and shipping address match your listing. If you use Fulfilment by Amazon, check that the shipment status shows “Processing” on Amazon’s end. If you fulfil orders yourself, make sure your packaging materials and shipping labels are ready. A mismatched order caught late leads to cancellations, and cancellations in your first week are devastating to your metrics.
Ship Within the Promised Window
Amazon sets a Late Shipment Rate threshold of less than 4%. For a new seller with only one or two orders, even a single late shipment pushes that metric into dangerous territory. Sneha Reddy from Hyderabad made it a rule to ship every order within six hours of confirmation using the Amazon Seller App to buy labels and confirm despatch from her phone. Within her first month, her early despatch consistency helped her listing appear more frequently in search results.
Send the Buyer a Professional Message
Once you have shipped the order, send a short message through Buyer-Seller Messaging. Thank the buyer, confirm the shipment, and mention the expected delivery window. Do not ask for a review in this first message. Amazon’s communication policy restricts what you can say, and pushing for feedback too early comes across as desperate. This small step tells the buyer there is a real person behind the store.
Day 3-4 – Read Your Seller Central Business Reports & Create Amazon Seller Checklist
Where to Find Your Business Reports
Most new sellers never open their reports in week one. That is a missed opportunity. Navigate to Reports, then Business Reports in Seller Central. The report you want is called “Detail Page Sales and Traffic.” It shows you sessions, page views, units ordered, and a column called Unit Session Percentage, which is your conversion rate. Even with just one sale, this data tells you something valuable about how your listing is performing. Our guide on key metrics to monitor in Seller Central goes deeper into each of these numbers.
What the Numbers Tell You This Early
If your sessions are high but your conversion rate sits below 5%, your listing is attracting clicks but failing to convince buyers. That usually points to weak images, unclear descriptions, or pricing that does not match perceived value. Vikram Deshmukh from Nagpur spotted this pattern on day four. His bamboo toothbrush listing pulled 80 sessions a day but converted at just 1.2%. He checked his listing on mobile and realised the images looked blurry on smaller screens. One image refresh later, his conversion rate climbed to 6.8% within two weeks.
If you want a structured system to make sense of these numbers and build a real Amazon business, the 3-Day Amazon Business Training walks you through the exact reports, metrics, and decisions that separate struggling sellers from profitable ones.
Verify Your GST and Tax Settings
For sellers on Amazon.in, getting your GST details right from the start saves painful corrections later. Confirm that your GSTIN is correctly linked in Seller Central and that HSN codes match each product’s actual tax category. A common mistake is using a generic HSN code during listing creation, leading to incorrect tax calculations on invoices. Fixing this after dozens of orders is far harder than getting it right in week one. If you need a refresher on how GST works for Amazon sellers, read our breakdown of how GST impacts Amazon sellers in India.
Set Up Automated Pricing Rules
Amazon offers a tool called Automate Pricing that adjusts your price based on competitor activity. The key is setting a floor price so the tool never drops below your profit margin. Manual pricing works with one product, but once you scale to five or ten SKUs, you cannot monitor competitor prices daily. Setting this up now protects your margins as your catalogue grows.
Enable Amazon Seller App Notifications
Download the Amazon Seller App if you have not already, and turn on push notifications for new orders, buyer messages, and account health alerts. Amazon tracks your response time, and slow replies hurt your seller performance score. Keeping notifications active means you never miss an urgent message, even when you are away from your laptop.
Day 5 – Ask for Your First Review the Right Way
Amazon’s “Request a Review” Button
Reviews are the currency of trust on Amazon, and most new sellers either beg for them or forget to ask at all. Amazon provides a built-in solution. Go to Seller Central, open the Orders tab, find your delivered order, and click the “Request a Review” button on the order details page. Amazon sends a polite, standardised email to the buyer on your behalf. The best timing is one to two days after confirmed delivery, when the buyer has had a chance to use the product but the experience is still fresh. Ananya Gupta from Jaipur used this button on every single delivered order and had three genuine reviews within her first month, enough to make her listing look credible to new buyers. For more strategies, our detailed guide on how to get product reviews on Amazon covers every approved method.
What You Must Never Do for Reviews
Amazon’s review manipulation policy is strict. Never offer discounts or incentives in exchange for reviews. Never ask friends or family to leave ratings. Never contact buyers outside Amazon’s messaging system to request feedback. Amazon’s detection algorithms flag unusual review patterns, and the penalty is often permanent account suspension. One authentic 4-star review is worth more than ten suspicious 5-star ratings.
Day 5-6 – Check Your Seller Performance Metrics
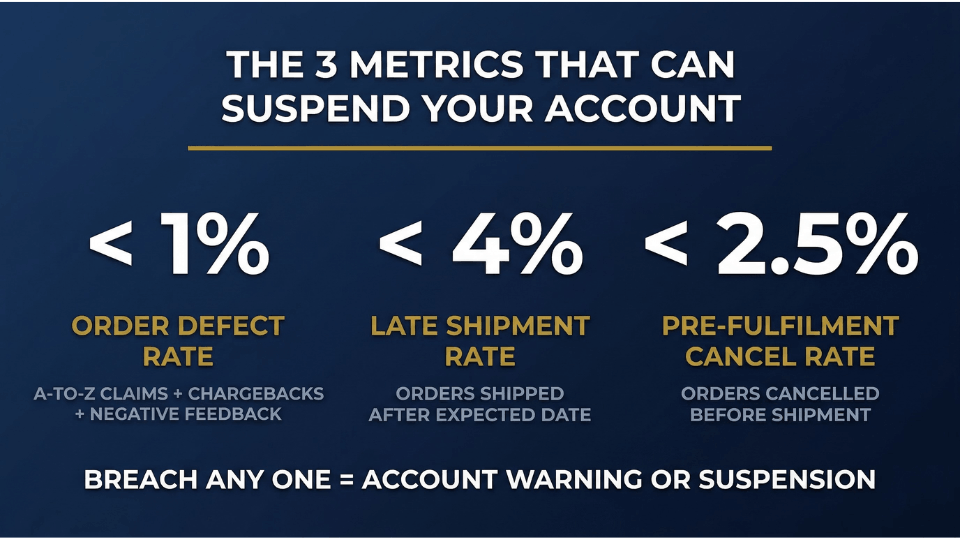
The Three Metrics That Can Get You Suspended
Amazon tracks three critical seller performance metrics, and breaching any of them can lead to account suspension. Your Order Defect Rate must stay below 1%. This includes A-to-Z Guarantee claims, chargebacks, and negative feedback. Your Late Shipment Rate must remain below 4%. And your Pre-Fulfilment Cancel Rate needs to stay under 2.5%. For a new seller with a handful of orders, the math is unforgiving. One defective order out of five means a 20% defect rate, which triggers an immediate warning. If you want to understand how to avoid common Amazon policy violations, that guide covers the full picture.
How to Read the Account Health Dashboard
Navigate to Performance, then Account Health in Seller Central. You will see a colour-coded dashboard: green means you are meeting targets, yellow means you are approaching a threshold, and red means you have breached it. Rohit Menon from Ernakulam saw a yellow warning in his first week because a test order from a friend triggered an unusual activity flag. He called Seller Support within 24 hours and got the flag removed. The lesson: check this dashboard every two days in your first week, and respond to warnings within hours.
If these metrics feel overwhelming, you are not alone. The 3-Day Amazon Business Training breaks down every Seller Central dashboard into simple, actionable steps so you spend less time confused and more time selling.
Day 6-7 – Plan Your First Month on Amazon
Restock or Expand Your Catalogue
By the end of week one, you should have enough data to make a basic inventory decision. If your first product is generating interest and your conversion rate looks healthy, plan a restock before you run out. Stockouts kill organic ranking, and rebuilding takes weeks. If demand feels uncertain, consider adding one or two related SKUs. Amazon’s new seller guide recommends diversifying within the first 90 days to reduce dependence on a single product.
Launch Your First Sponsored Products Campaign
You do not need a large budget to start advertising. Begin with an automatic Sponsored Products campaign at Rs 200 to 500 per day. An automatic campaign lets Amazon decide which search terms to show your ad for. Run it for seven days, then pull the search term report to see which keywords converted into sales. Those converting keywords become the foundation of your first manual campaign. Starting PPC in week one gives your listing a visibility boost when it needs it most.
Set Weekly Review Habits
The single most valuable habit you can build in your first month as an Amazon seller is a weekly review ritual. Block 30 minutes every Monday to check your business reports for traffic and conversion trends, your PPC performance for spend and ACOS, and your account health dashboard for new warnings. Consistency is not exciting, but it separates sellers who last from those who quit after 90 days.
Mistakes New Sellers Make in the First Week
Ignoring Buyer Messages
Amazon expects a response to every buyer message within 24 hours. Your response time feeds into your overall seller performance score. Deepika Joshi from Lucknow went on a two-day family trip right after her first sale and missed two buyer messages. One buyer filed an A-to-Z claim, and her Featured Offer eligibility was temporarily revoked. Keep notifications on and reply promptly, even if the answer is short.
Changing Your Listing Too Soon
The temptation after a first sale is to change everything, new title, new images, new price. Resist that urge. Major changes reset some of the ranking signals Amazon has been building. Give your listing at least two to three weeks of data before significant edits. If you must tweak something, change one element at a time so you can measure the effect.
FAQ – What Happens After Your First Sale on Amazon
What should I do after my first sale on Amazon?
Confirm the order in Seller Central, ship within the promised window, and message the buyer with a shipping update. Over the next few days, check your business reports, verify GST settings, and request a review once the product is delivered.
How long does it take to get your first sale on Amazon?
It depends on your product, pricing, and advertising. Some sellers on Amazon.in see their first order within 24 to 48 hours, especially with FBA. Others wait two to four weeks. A small Sponsored Products campaign from day one can accelerate the timeline.
How do I check my seller performance after my first order?
Go to Performance, then Account Health in Seller Central. You will see your Order Defect Rate, Late Shipment Rate, and Pre-Fulfilment Cancel Rate with colour-coded indicators. Check every two days during your first week.
How do I get reviews as a new Amazon seller?
Use the “Request a Review” button in Seller Central on each delivered order, timed one to two days after delivery. Never offer incentives or use external channels. Authentic reviews build slowly, but they last.
What metrics should a new Amazon seller track in week one?
Focus on account health metrics (ODR, LSR, PFCR), business report data (sessions, conversion rate), and if running ads, your PPC spend and ACOS. Together, these give you a full picture of your listing’s health.
Does Amazon give new sellers any special benefits?
Yes. Amazon offers incentives worth over Rs 1 lakh for Indian sellers, including Sponsored Products credits, FBA fee discounts, and promotional tools. These are available during your first 90 days, so activate them early.
Should I run ads in my first week on Amazon?
Yes. Even a small automatic campaign at Rs 200 to 500 per day helps your listing gain early visibility. Let Amazon discover which search terms drive clicks, then build a manual campaign from that data.
What happens if I get a return on my first order?
Process it promptly. For FBA sellers, Amazon handles returns automatically. For FBM sellers, respond within 24 hours and issue the refund once you receive the product back. A smooth return can still earn positive feedback.
Conclusion
Your first sale on Amazon is proof that someone wants what you are selling. But the real work starts in the seven days that follow. Confirm and ship fast on day one. Read your reports by day three. Request a review by day five. Audit your account health by day six. Plan your first full month by day seven. Every step in this checklist exists to protect your account and build momentum.
If you want a step-by-step system for turning that first order into a consistent, profitable Amazon business, the 3-Day Amazon Business Training gives you the exact playbook. Your second sale should not be an accident.